Assembling your own gaming PC can be both a fun and fulfilling project. Not only will you get to customize every aspect of your machine, but you’ll also save money compared to buying a pre-built system. This guide will walk you through the steps of building your first gaming PC, including choosing the right components and putting everything together.
Why Build a Gaming PC?
There are several reasons why you might choose to build your own gaming PC instead of buying a pre-built one. Here are a few key benefits:
- Customization: You get to choose every part to fit your personal preferences, whether that’s performance, aesthetics, or price.
- Cost-Effectiveness: Building your PC can often be cheaper than buying a pre-built system with the same specifications.
- Upgradability: You have more control over upgrading components in the future as your gaming needs evolve.
- Satisfaction: There’s a sense of accomplishment and pride in assembling your own system and seeing it come to life.
Step 1: Gather Your Components
Here’s what you’ll need:
- Central Processing Unit (CPU): The CPU acts as the core of your computer. Select a processor capable of running modern games smoothly. Popular choices include Intel Core processors and AMD Ryzen. Suggested Options: AMD Ryzen 5 5600X or Intel Core i7-12700K for a balanced gaming experience.
- Graphics Processing Unit (GPU): The GPU plays a vital role in gaming performance by rendering graphics and ensuring smooth visuals during gameplay.
- Motherboard: The motherboard connects all your components. It’s important to choose a motherboard that supports your CPU, GPU, and other parts. Ensure it has enough PCIe slots and RAM slots for future upgrades.
- Recommendation: ASUS ROG Strix B550-F for AMD builds or MSI Z590-A PRO for Intel builds.
- Storage: Solid-state drives (SSD) offer faster loading times compared to hard disk drives (HDD). A 500GB SSD is a good starting point, and you can add an additional HDD for more storage if needed.
- Recommendation: Samsung 970 Evo 1TB NVMe SSD for speed.
- Power Supply Unit (PSU): The PSU provides power to all components. It’s crucial to choose a high-quality PSU to ensure safety and efficiency.
- Recommendation: EVGA SuperNOVA 650 G5, 80 Plus Gold Certified for optimal power efficiency.
- Case: The case houses all your components. It should provide good airflow and enough space for your parts, especially your GPU and cooling system.
- Recommendation: NZXT H510 or Fractal Design Meshify C for airflow.
- Cooling System: Good cooling is essential to maintain your PC’s performance and prevent overheating. Air cooling with fans is the most common choice for gaming PCs.
- Recommendation: Cooler Master Hyper 212 for air cooling or Corsair iCUE H100i for liquid cooling.
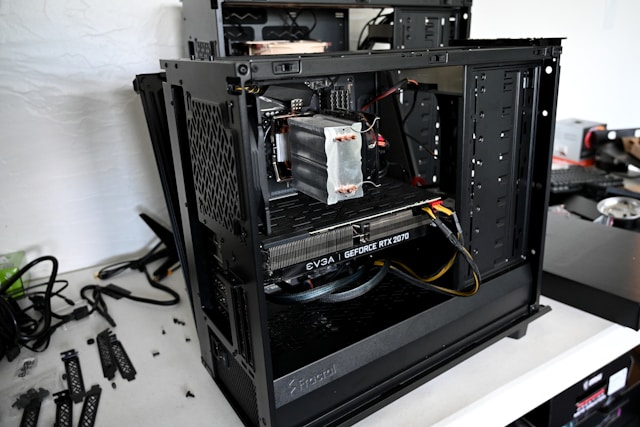
Step 2: Assemble Your PC
Once you’ve gathered all the components, it’s time to assemble your PC. Here’s a step-by-step breakdown:
- Prepare the Case: Start by opening the case and removing any packaging or protective covers inside.
- Install the RAM: Install the RAM modules into the motherboard’s RAM slots. Press firmly until they click into place.
- Mount the Motherboard: Place the motherboard into the case, aligning it with the standoffs. Screw it into place securely.
- Install the PSU: Install the power supply at the bottom of the case. Make sure it’s securely fastened.
- Install the Storage: Mount your SSD and/or HDD into the case, connecting them to the motherboard and PSU.
- Install the GPU: Insert the GPU into the PCIe slot on the motherboard and screw it into place.
- Connect the Cables: Connect all power cables from the PSU to the motherboard, GPU, and storage devices. Don’t forget the power button, front panel USB ports, and audio jacks.
- Final Check: Double-check all connections to ensure everything is secure and properly connected before closing up the case.
Step 3: Install the Operating System and Drivers
- Install Windows: Insert a bootable USB drive with the Windows installation files and boot up your PC. Follow the on-screen instructions to install Windows.
- Install Drivers: After Windows is installed, install all necessary drivers for your GPU, motherboard, and other components.
Step 4: Test Your PC
Before you start gaming, it’s important to test your PC to ensure everything is running smoothly. Use a benchmarking tool like 3DMark or Unigine Heaven to test the performance of your GPU, CPU, and other components. If everything runs well, it’s time to install your favorite games and start playing!
Conclusion
Building your first gaming PC can seem like a daunting task, but with careful planning and the right components, it can be a fun and rewarding experience. By following this guide, you’ll be able to assemble a gaming PC that meets your needs, whether you’re playing the latest AAA titles or engaging in competitive esports. Enjoy the process, and happy casinoclic.com/fr gaming!